An MCP Server To Describe Java Classes
AI coding agents are excellent tools for boosting developer productivity by speeding up many software-development tasks — such as generating boilerplate, writing unit tests, or even implementing new features.
These tools rely on the fact that LLMs are trained on vast quantities of publicly available text — including source code in many common languages. They are familiar not only with the basic syntax, but also with the common patterns and data structures used in thousands of different projects.
However, often the fact that they are trained solely on publicly available data becomes a limitation.
The Issue of AI Coding Agents With Private Dependencies
When working on a complex project with an AI-coding tool, you need the agent to have access not only to your application’s source code, but also to every dependency it uses.
For example, suppose you want the agent to write a method that builds a complex structure of nested DTOs — say, a Product with many Categories, a Brand, several Prices, etc. — but those classes aren’t in your source code; they’re in a library you’ve injected as a dependency in your project. If the agent can’t see the source code for those classes, it won’t know how to use them.
There are workarounds: for example, the agent could look for sections of your project that use those classes and reproduce the same patterns. Or, if your classes are part of a publicly available library, it can even search in the Internet how to use them.
However, if those classes are part of a private dependency, not in your source code or publicly available, the agent simply won’t know how to use them. And since LLMs never respond with “I don’t know how to use that class”, the agent will likely generate code that won’t compile or that will fail at runtime.
An MCP Server To Explain How A Class Works
The solution is to provide the agent with a tool that allows it to discover how those external classes work. Most coding agents support the Model Context Protocol (MCP), “an open-source standard to connect AI applications to external systems”.
There are already projects like mcp-javadc that use a java decompiler to turn bytecode into readable source code.
In this article, I present a solution that uses a different approach. TJMCP is an MCP server that generates documentation about compiled Java clases, using the Java Class File API and a local LLM to produce a Markdown document about them.
Before getting into how this tool works, let’s do an introduction to the MCP protocol.
How MCP Servers Work
The Model Context Protocol was introduced by Anthropic in 2024, aiming to solve the main limitation AI applications have - their isolation from private data:
As AI assistants gain mainstream adoption, the industry has invested heavily in model capabilities, achieving rapid advances in reasoning and quality. Yet even the most sophisticated models are constrained by their isolation from data—trapped behind information silos and legacy systems. Every new data source requires its own custom implementation, making truly connected systems difficult to scale.
MCP addresses this challenge. It provides a universal, open standard for connecting AI systems with data sources, replacing fragmented integrations with a single protocol. The result is a simpler, more reliable way to give AI systems access to the data they need.
The protocol defines how an AI application that uses an LLM, referred to as a Host, interacts with external systems, called Servers, in order to discover what tools they have available and how to invoke them when the LLM requires it.
MCP establishes that the agent will keep a directory of all the systems it can interact with, and will internally create one Client per Server, to maintain a connection open with it.
The following flow diagram shows a simplified interaction:
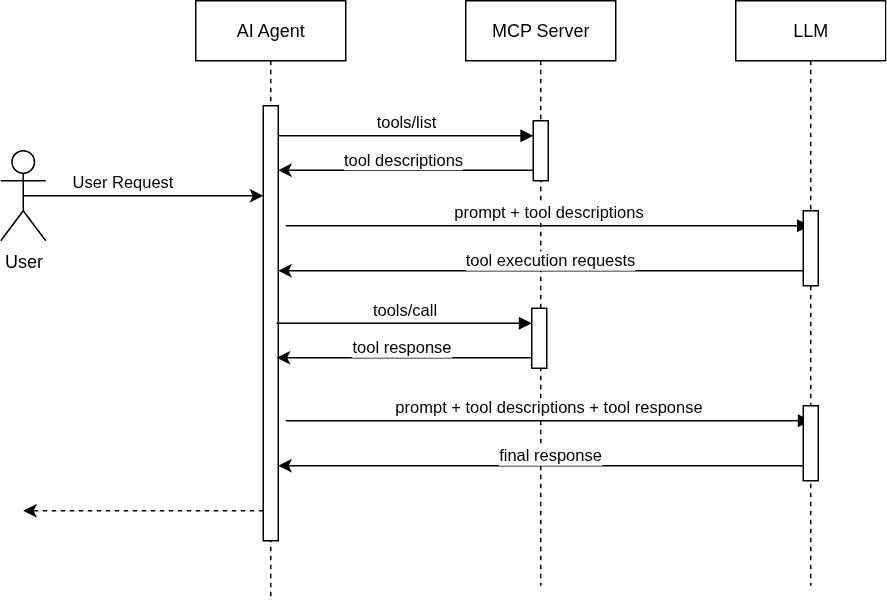
- Upon initialization, each MCP Client will ask it’s MCP Server for the list of tools it offers.
- When the Agent needs to perform an action, it will prompt the LLM including the list of available tools.
- If the LLM identifies any potential use of one of the tools, it will include a tool execution request in the response.
- The Agent will invoke the tool with the parameters received from the LLM.
- The Agent will invoke the LLM again, including the result from the tool call.
- The LLM will generate the final response with all the information provided.
Of course, there is much more to learn from the MCP protocol, this is just a brief introduction.
Besides tools, MCP Servers can also expose resources to add to the LLM context, and prompts, reusable templates that define the expected inputs.
Take a look at the official documentation for more details.
TJMCP
TJMCP is built around the following concepts: CodeExplainer, ReportBuilder and ClassDocumenter. Let’s see how each one of this core concepts work.
CodeExplainer
A CodeExplainer implements an interface with a single method:
public interface CodeExplainer {
  String explainCode(CodeModel codeModel);
}
The explainCode method receives an instance of java.lang.classfile.CodeModel which is part of the Java Class File API. There are several implementations of this interface (for testing, for example), but the main one uses LangChain4J to communicate with Ollama:
public class LangChain4jOllamaExplainer implements CodeExplainer {
  private final String baseUrl;
  private final String chatModelName;
  private final String systemPrompt;
  private final String promptTemplate;
  private final Double temperature;

  private ChatModel chatModel;

//...

  @Override
  public String explainCode(CodeModel codeModel) {
    var messages =
        List.of(
            SystemMessage.from(systemPrompt),
            UserMessage.from(promptTemplate.formatted(codeModel.toDebugString())));

    var request = ChatRequest.builder().messages(messages).build();
    var response = getChatModel().chat(request);
    return response.aiMessage().text();
  }

  private ChatModel getChatModel() {
    if (chatModel == null) {
      chatModel =
          OllamaChatModel.builder()
              .baseUrl(baseUrl)
              .modelName(chatModelName)
              .temperature(temperature)
              .build();
    }
    return chatModel;
  }
}
ReportModel + ReportBuilder
ReportModel uses the Class File Api to extract information about the given class, and builds a data structure with that information. Then, the default implementation of ReportBuilder uses JTE to process a text template and generate the report:
@Singleton
public class JteReportBuilder implements ReportBuilder {
  private TemplateEngine templateEngine;
  private static final String TEMPLATE_FILE = "ClassReport.jte";

  @Override
  public String build(ReportModel model) {
    TemplateOutput output = new StringOutput();
    getTemplateEngine().render(TEMPLATE_FILE, model, output);
    return output.toString();
  }

  private TemplateEngine getTemplateEngine() {
    if (templateEngine == null) {
      CodeResolver codeResolver = new ResourceCodeResolver("jte");
      this.templateEngine = TemplateEngine.create(codeResolver, ContentType.Plain);
    }
    return templateEngine;
  }
}
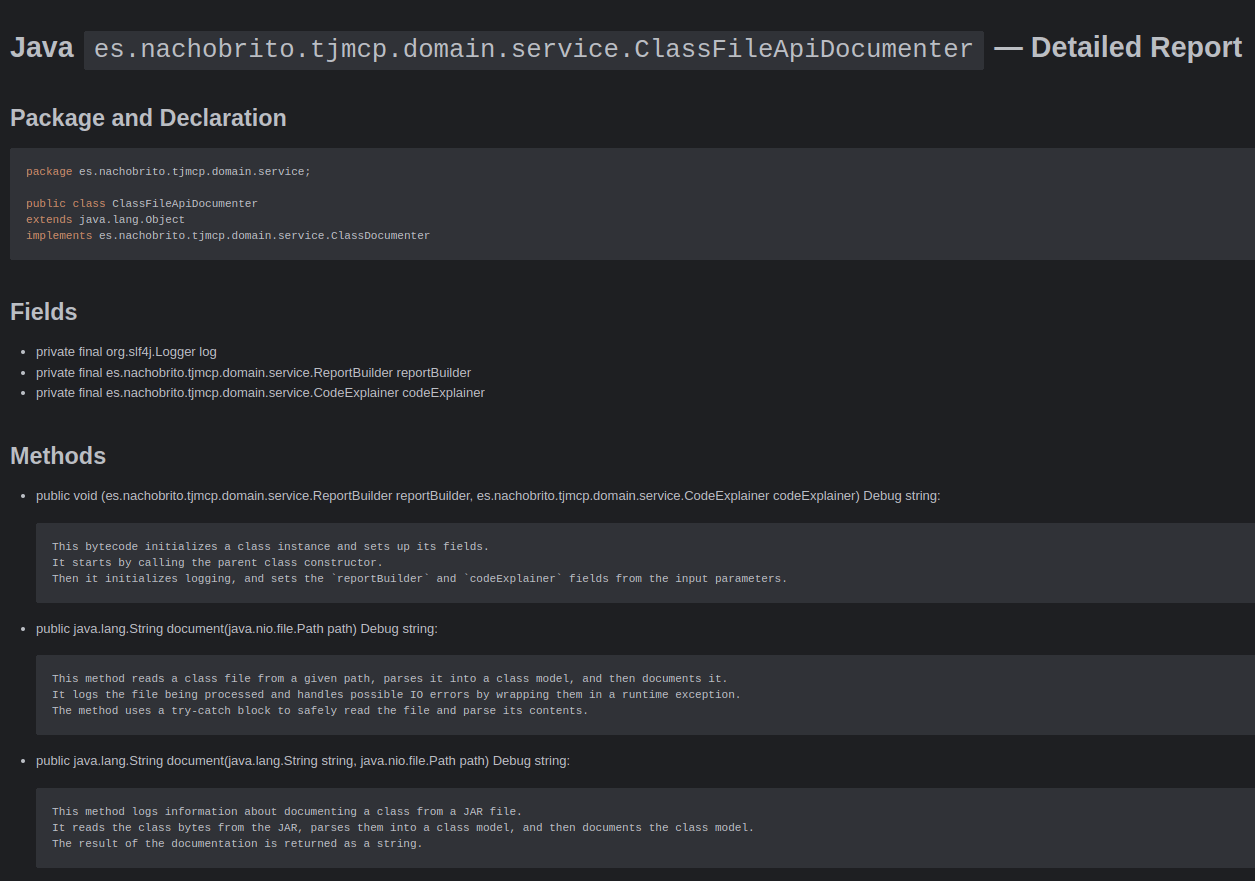
ClassDocumenter
The ClassDocumenter is the main service, able to receive different indications on how to access a class (by accessing directly to the .class file, or extracting it from inside a Jar library) and use the ReportBuilder and CodeExplainer to produce the report:
@Singleton
public class ClassFileApiDocumenter implements ClassDocumenter {
  private final Logger log = LoggerFactory.getLogger(getClass());

  private final ReportBuilder reportBuilder;
  private final CodeExplainer codeExplainer;

//...

  @Override
  public String document(Path sourceFile) {
    log.debug("Documenting class file: {}", sourceFile.toString());

    byte[] bytes;
    try {
      bytes = Files.readAllBytes(sourceFile);
    } catch (IOException e) {
      throw new RuntimeException(e);
    }
    var classModel = ClassFile.of().parse(bytes);
    return document(classModel);
  }

  @Override
  public String document(String className, Path jarFilePath) {
    log.debug("Documenting class {} from jar file: {}", className, jarFilePath.toString());

    var bytes = JarFileHelper.readClass(className, jarFilePath);
    var classModel = ClassFile.of().parse(bytes);
    return document(classModel);
  }

  @Override
  public String document(ClassModel classModel) {
    var model = ReportModel.with(classModel, codeExplainer);
    return reportBuilder.build(model);
  }
}
As you can see, the logic isn’t particularly complex. There are some other details like a caching implementation of the ClassDocumenter interface that avoids having to call the LLM multiple times with the same class.
All that remains is to turn this service into an MCP server. Let’s see how.
Micronaut MCP
As I mentioned before, to build an MCP server involves implementing a series of interactions with MCP Clients:
- Capability discovery
- Notifications (e.g. to update the clients when a new tool is available)
- Tool invocation, including JSON Schema processing for input/output messages
- Resource definitions
- Prompt completions
TJMCP is built on top of Micronaut 4.10, and uses the Micronaut MCP module to easily implement the protocol. All we have to do is declare beans and use specific annotations to mark them as Tools, Resources or Prompts.
Adding the module involves only two steps:
- Add the dependency to the project:
<dependency>
    <groupId>io.micronaut.mcp</groupId>
    <artifactId>micronaut-mcp-server-java-sdk</artifactId>
</dependency>
- Add a few properties to your application configuration:
micronaut.mcp.server.info.name=TJMCP
micronaut.mcp.server.info.version=0.1
micronaut.mcp.server.transport=STDIO
You can use STDIO or HTTP as the transport for your MCP Server, in this case I am expecting the server to be running in the same machine where I am working with the code, so using STDIO is more convenient.
The next step is to declare the tools you want to expose with the @Tool annotation. In this case, the application exposes two of the methods in ClassDocumenter:
package es.nachobrito.tjmcp.infrastructure.micronaut.mcp;

//...

@Singleton
public class DocumentClassFileTool {
  private final ClassDocumenter classDocumenter;

  public DocumentClassFileTool(ClassDocumenter classDocumenter) {
    this.classDocumenter = classDocumenter;
  }

  @Tool(
      title = "Document a class file",
      description =
          "Returns a report describing how to use the class defined in the provided class file.",
      annotations =
          @Tool.ToolAnnotations(
              readOnlyHint = true,
              destructiveHint = false,
              idempotentHint = true,
              openWorldHint = false,
              returnDirect = true))
  String documentClassFile(
      @ToolArg(description = "The absolute path of the class file") String classFilePath) {
    var path = Path.of(classFilePath);
    if (!path.toFile().isFile()) {
      throw new IllegalArgumentException("Invalid path: %s".formatted(classFilePath));
    }
    return classDocumenter.document(path);
  }

  @Tool(
      title = "Document a class inside a Jar file",
      description =
          "Returns a report describing how to use the class with the given name, found inside a Jar file.",
      annotations =
          @Tool.ToolAnnotations(
              readOnlyHint = true,
              destructiveHint = false,
              idempotentHint = true,
              openWorldHint = false,
              returnDirect = true))
  String documentClassInJar(
      @ToolArg(description = "The full class name") String className,
      @ToolArg(description = "The absolute path of the jar file") String jarFilePath) {
    var path = Path.of(jarFilePath);
    if (!path.toFile().isFile()) {
      throw new IllegalArgumentException("Invalid path: %s".formatted(jarFilePath));
    }
    if (className == null || className.isEmpty()) {
      throw new IllegalArgumentException("className cannot be empty");
    }
    return classDocumenter.document(className, path);
  }
}
The MCP In Action
To add TJMCP to your system you will need to:
- Install Ollama
- Choose a model, I have been doing my tests with qwen3-coder
- Clone the TJMCP repository
- Run
mvn clean installto compile the project - Configure your coding agent. I have used Cline, but the configuration is similar in other tools. You need to add a json snippet to the list of MCP servers:
{
    "tjmcp": {
    "command": "/path/to/java",
    "args": [
        "-jar",
        "/path/to/project/target/tjmcp-0.1.jar"
    ],
    "env": {
        "TJMCP_CACHE_FOLDER": "/path/to/tjmcp-cache",
        "TJMCP_LANGCHAIN4J_OLLAMA_URL": "http://localhost:11434",
        "TJMCP_LANGCHAIN4J_OLLAMA_MODEL": "qwen3-coder:latest"
    },
    "timeout": 300
    }
}
TJMCP shoud appear in the list of MCP servers:
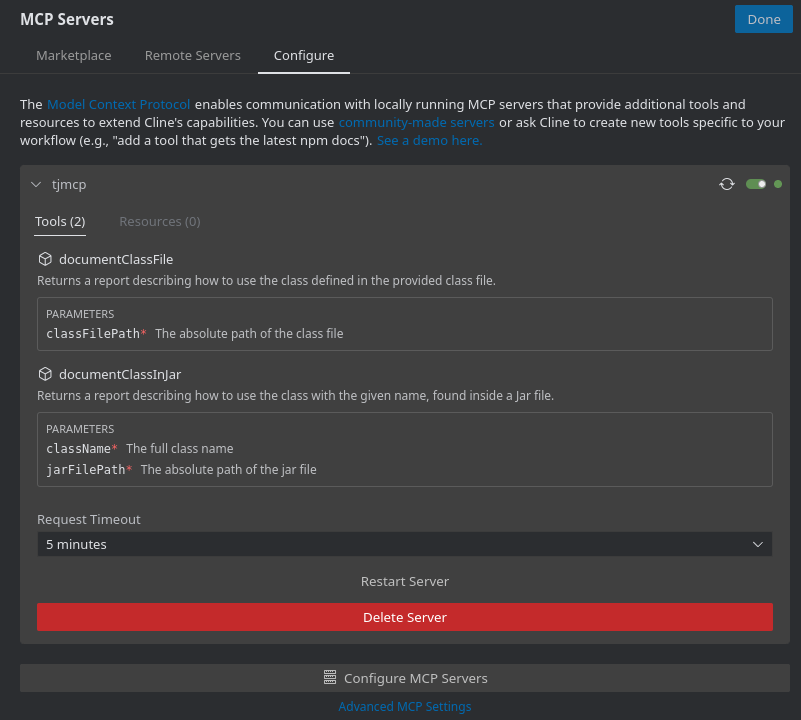
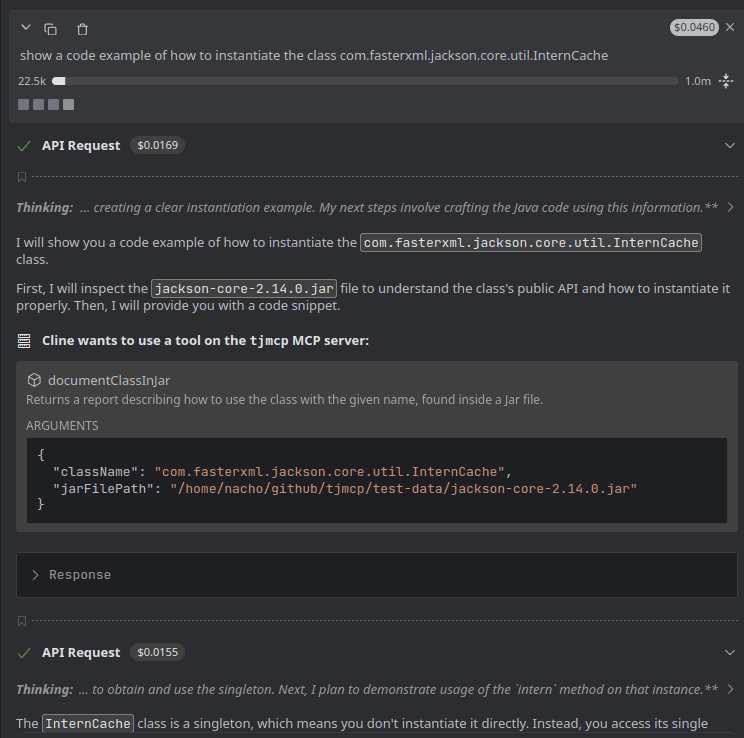
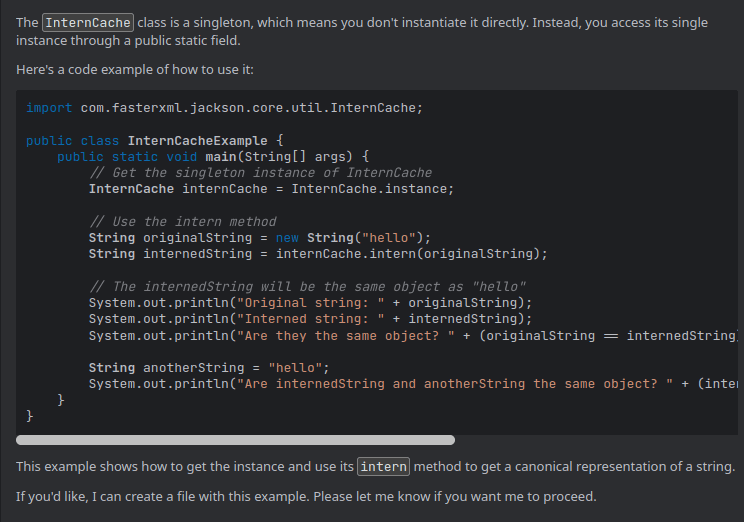
At this point, your system is ready to use the server. For example, I asked Cline to implement a code snippet to use the com.fasterxml.jackson.core.util.InternCache class, as it is part of the internal implementation of Jackson, something that no one uses to do explicitly and thus would be hard to find in the public data:
show a code example of how to instantiate the class com.fasterxml.jackson.core.util.InternCache
Cline detects that the source code of that class is not available, and from the list of MCP servers it indentifies TJMCP as the right tool to find about that class:
After getting the response from the MCP, Cline is able to show me how to work with that class:
Conclusion
In this article, we’ve discussed a common issue encountered when working with AI-coding agents — namely, their limited access to private code. We also covered the basics of the Model Context Protocol and introduced a tool that may help developers who work with private dependencies they can’t publish. I hope you found this useful!